Front Wiring Harness Protector No. 1
- Disconnect the negative battery cable. (See NEGATIVE BATTERY CABLE DISCONNECTION/CONNECTION [SKYACTIV-G 2.5]
.)
- Remove the air cleaner assembly. (See INTAKE-AIR SYSTEM REMOVAL/INSTALLATION [SKYACTIV-G 2.5]
.)
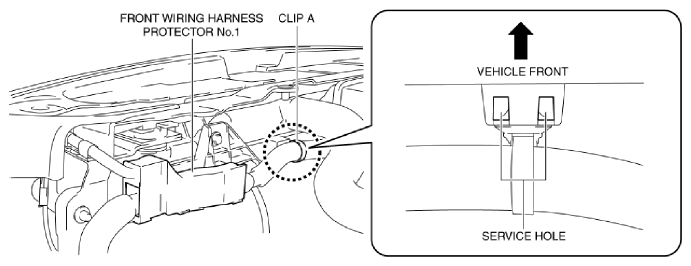
- Insert a tape-wrapped flathead screwdriver into the service hole in the position shown in the figure.
 Courtesy of MAZDA MOTORS CORP.
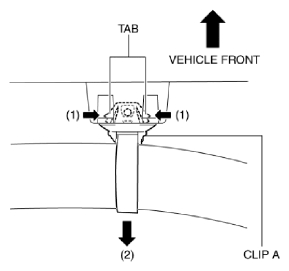
- While pressing the tabs of clip A in the direction of the arrows (1) shown in the figure, pull clip A in the direction of the arrow (2) shown in the figure to detach the tabs of clip A from the radiator.
 Courtesy of MAZDA MOTORS CORP.
- Pull out clip A.
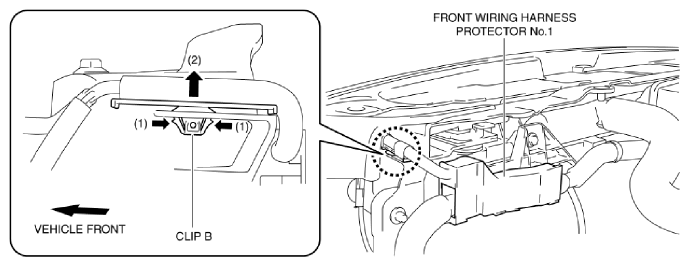
- While pressing the tabs of clip B in the direction of the arrows (1) shown in the figure, pull clip B in the direction of the arrow (2) shown in the figure to detach the tabs of clip B from the front bumper.
 Courtesy of MAZDA MOTORS CORP.
- Pull out clip B.
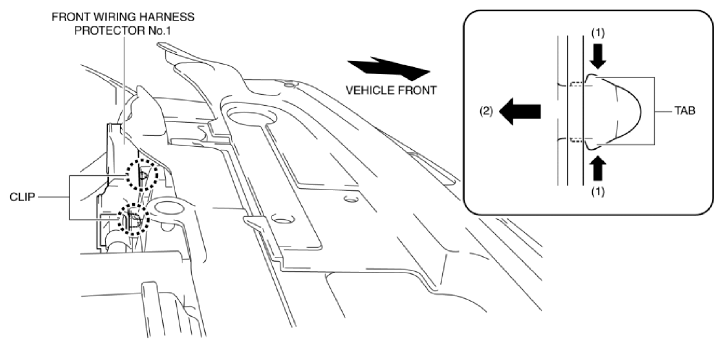
- While pressing the clip tabs in the direction of the arrows (1) shown in the figure, pull the front wiring harness protector No. 1 in the direction of the arrow (2) to detach the clip tabs from the radiator.
 Courtesy of MAZDA MOTORS CORP.
- Detach all the clip tabs from the radiator and pull out the front wiring harness protector No. 1 from the radiator.
- Insert a tape-wrapped flathead screwdriver into the gap between front wiring harness protector No. 1 and the tab shown in the figure.
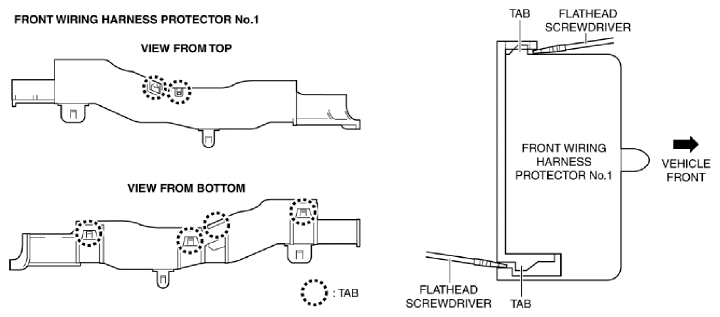 Courtesy of MAZDA MOTORS CORP.
- While lifting up the hook in the direction of the arrow (1) shown in the figure using a flathead screwdriver, pull the hook in the direction of the arrows (2) shown in the figure to detach the tab from the hook.
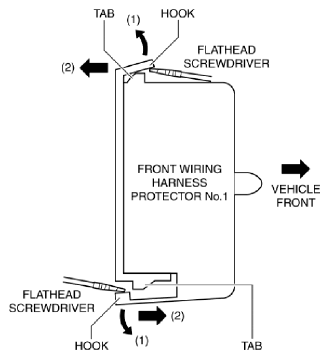 Courtesy of MAZDA MOTORS CORP.
- Detach all the tabs from hooks and remove the front wiring harness protector No. 1.
- Install in the reverse order of removal.